For the third year in a row Apple has been named the World’s Most Admired Company by Fortune Magazine — this year by the widest margin ever. What makes Apple so admired? Fortune explains: “Product, product, product. This is the company that has changed the way we do everything from consume music to design products to engage with the world around us.” Apple also ranked #1 in Innovation among all companies.
Read More
See the TOP 50 companies..
Thursday, March 4, 2010

Monday, March 1, 2010
How to trim NSString in Obj C
To trimming an NSString in Objective C ..
e.g:
e.g:
NSString *trimmedString = [description stringByTrimmingCharactersInSet:[NSCharacterSet whitespaceAndNewlineCharacterSet]];
Friday, February 12, 2010
resize or scale UIImage
hi,
we can scale the UIImage to any size using the follwing method
add this code to your .h file
add the following to .m file
e.g to resize an image
we can scale the UIImage to any size using the follwing method
add this code to your .h file
@interface UIImage (INResizeImageAllocator)
+ (UIImage*)imageWithImage:(UIImage*)image
              scaledToSize:(CGSize)newSize;
- (UIImage*)scaleImageToSize:(CGSize)newSize;
@end
add the following to .m file
@implementation UIImage (INResizeImageAllocator)
+ (UIImage*)imageWithImage:(UIImage*)image
              scaledToSize:(CGSize)newSize;
{
    UIGraphicsBeginImageContext( newSize );
    [image drawInRect:CGRectMake(0,0,newSize.width,newSize.height)];
    UIImage* newImage = UIGraphicsGetImageFromCurrentImageContext();
    UIGraphicsEndImageContext();


    return newImage;
}
- (UIImage*)scaleImageToSize:(CGSize)newSize
{
    return [UIImage imageWithImage:self scaledToSize:newSize];
}
e.g to resize an image
self.resizeimage = [UIImage imageWithImage:actual_image scaledToSize:CGSizeMake(65.0f, 65.0f)];
Thursday, February 11, 2010
Formatting UITextView
There is no feature to format the text in UITextView
1.
use the html formatted text as input.
e.g:
2. Or we can load a local html file
e.g:
We can use the UIWebView to display the formatted text
The easy two methods are :
1. - (void)loadHTMLString:(NSString *)string baseURL:(NSURL *)baseURL
2. - (void)loadRequest:(NSURLRequest *)request
1.
use the html formatted text as input.
e.g:
NSString *htmlText = @"<html><head><meta name=""viewport"" content=""width=320""/></head><body><h3>Header</h3><p>Just for testing n;</p></body</html>";
[webView loadHTMLString:htmlText baseURL:[NSURL URLWithString:@"http://www.apple.com"]];
2. Or we can load a local html file
e.g:
[webView loadRequest:[NSURLRequest requestWithURL:[NSURL fileURLWithPath:[[NSBundle mainBundle] pathForResource:@"index" ofType:@"html"]isDirectory:NO]]];
Tuesday, February 9, 2010
Dynamic Height for UITextView / UILabel / UITableViewCell
we can use this for calculating the height taken by a UILabel or UITextView or we can use this same method to calculate the height of cell according to its content..
For UITableView
we can use like
CGRect frame1 = CGRectMake(5.0, 100.0, 300.0, 75.0 );
    UITextView *textView = [[UITextView alloc] initWithFrame:frame1];
    textView.font = [UIFont systemFontOfSize:17.0];
    NSString *str  = @"The Lord takes care of me as his sheep; I will not be without any good thing.";
    CGSize        textSize = { 300.0f, 9999.0f };
    CGSize size1 = [str sizeWithFont:textView.font constrainedToSize:textSize lineBreakMode:UILineBreakModeWordWrap];
    textView.text = str;
    frame1.size.height = size1.height;
    textView.frame = frame1;
    [self.view addSubview:textView];
    [textView release];
For UITableView
we can use like
- (CGFloat)tableView:(UITableView *)tableView heightForRowAtIndexPath:(NSIndexPath *)indexPath
{
//calculate the height of the text displayed on this cell using the above method
return MAX(size1.height, kMinRowHeight);
}
Macworld 2010 Feb 9 -13 @ San Francisco
Macworld 2010 is a five day celebration that will educate, entertain, and immerse you in the Mac community. Macworld offers access to hundreds of Mac products and services, paired with expert advice, demonstrations and instruction. Macworld conference programs feature industry leading minds, presenting cutting edge product training on the topics you most want to see. Whether you are a creative professional or a Mac IT pro, Macworld has the conference content, special presentations, exhibit hall highlights and experiences that meet your specific Mac needs.
Read More
Read More
Sunday, January 31, 2010
PIT Solutions extends Blue Brain association
Technopark based PIT Solutions to partner Blue Brain Project
Read More
THIRUVANANTHAPURAM: PIT Solutions based at the Technopark in Thiruvananthapuram, which focuses on IT solutions to the small and medium sector, has extended its comprehensive IT support to the Blue Brain project.
The project is the first comprehensive attempt to reverse re-engineer the mammalian brain in order to understand brain function and dysfunction through detailed simulations.
PIT Solutions will continue to partner Dr Henry Markram, director of the Swiss Federal Institute’s (EPFL) Brain Mind Institute, for the Blue Brain project. Dr Markram said the mysteries of the mind could be solved, and that it was possible to have a supercomputer that models all the brain’s 100 trillion synapses.
The project attempts to build a computerized copy of a brain, starting with a rat’s brain, and progressing to a human brain, inside one of the world’s most powerful computers. The project hopes to bring into being a mind that will be able to think, reason, express will, lay down memories and perhaps even experience different emotions including love, anger, sadness, pain and joy.
Read More
Thursday, January 28, 2010
Start Developing iPad Apps Today
iPhone Developer Program Members can start developing the next generation of innovative applications for iPad with iPhone SDK 3.2 beta, now available in the iPhone Dev Center.
The iPhone Dev Center also provides members with additional resources including the iPad Programming Guide, iPad Human Interface Guidelines, Preparing Universal Applications, and sample code.
The iPhone Dev Center also provides members with additional resources including the iPad Programming Guide, iPad Human Interface Guidelines, Preparing Universal Applications, and sample code.
Apple iPad SDK available soon, offers iPad development alongside of iPhone development
Here It Is: Apple Unveils The iPad, SDK Coming Later Today
The traditional Mail and Calendar applications for the iPhone have received a welcomed update for the iPad, and developers will be able to get their hands on the SDK for the device later today in preparation for the upcoming launch.
The traditional Mail and Calendar applications for the iPhone have received a welcomed update for the iPad, and developers will be able to get their hands on the SDK for the device later today in preparation for the upcoming launch.
Tuesday, January 26, 2010
Add work address filds to Addressbook contact programmatically
sample code..
//add work adress

        ABMutableMultiValueRef multiAddress1 = ABMultiValueCreateMutable(kABMultiDictionaryPropertyType);


        NSMutableDictionary *addressDictionary1 = [[NSMutableDictionary alloc] init];

        if(address1_street)        [addressDictionary1 setObject:address1_street forKey:(NSString *) kABPersonAddressStreetKey];

        if(address1_city)        [addressDictionary1 setObject:address1_city forKey:(NSString *)kABPersonAddressCityKey];

        if(address1_state)        [addressDictionary1 setObject:address1_state forKey:(NSString *)kABPersonAddressStateKey];

        if(address1_postalcode)    [addressDictionary1 setObject:address1_postalcode forKey:(NSString *)kABPersonAddressZIPKey];

        if(address1_country)    [addressDictionary1 setObject:address1_country forKey:(NSString *)kABPersonAddressCountryKey];

ABMultiValueAddValueAndLabel(multiAddress1, addressDictionary1, kABWorkLabel, NULL);

[addressDictionary1 release];

ABRecordSetValue(aRecord, kABPersonAddressProperty, multiAddress1, &anError);

CFRelease(multiAddress1);
Tuesday, January 5, 2010
iPhone : Update Addressbook contact
Hope you know how to add a contact to AddressBook,
And have stored the recordid in our application while adding.
following is the piece of code to get the contact id in Addressbook
.....
ABAddressBookAddRecord (addressBook, aRecord, &error);
if(ABAddressBookSave ( addressBook, &error)){
recordid = ABRecordGetRecordID (aRecord);
}
.....
Update a record
inputs are recordid, NSString* firstName,lastName,companyName
ABAddressBookRef addressBook = ABAddressBookCreate();
ABRecordRef aRecord = ABAddressBookGetPersonWithRecordID(addressBook, recordid);
if(aRecord){
/*** update firstname, lastname, company name **/
CFErrorRef error = NULL;
if(firstName){
if([firstName length]==0) firstName = nil;
ABRecordSetValue(aRecord, kABPersonFirstNameProperty, firstName, &error);
}
if(lastName){
if([lastName length]==0) lastName = nil;
ABRecordSetValue(aRecord, kABPersonLastNameProperty, lastName, &error);
}
if(companyName!= nil){
if([companyName length]==0) companyName = nil;
ABRecordSetValue(aRecord, kABPersonOrganizationProperty, companyName, &error);
}
/*******************/
CFErrorRef error = NULL;
BOOL isSaved = ABAddressBookSave ( addressBook, &error);
CFRelease(addressBook);
}
And have stored the recordid in our application while adding.
following is the piece of code to get the contact id in Addressbook
.....
ABAddressBookAddRecord (addressBook, aRecord, &error);
if(ABAddressBookSave ( addressBook, &error)){
recordid = ABRecordGetRecordID (aRecord);
}
.....
Update a record
inputs are recordid, NSString* firstName,lastName,companyName
ABAddressBookRef addressBook = ABAddressBookCreate();
ABRecordRef aRecord = ABAddressBookGetPersonWithRecordID(addressBook, recordid);
if(aRecord){
/*** update firstname, lastname, company name **/
CFErrorRef error = NULL;
if(firstName){
if([firstName length]==0) firstName = nil;
ABRecordSetValue(aRecord, kABPersonFirstNameProperty, firstName, &error);
}
if(lastName){
if([lastName length]==0) lastName = nil;
ABRecordSetValue(aRecord, kABPersonLastNameProperty, lastName, &error);
}
if(companyName!= nil){
if([companyName length]==0) companyName = nil;
ABRecordSetValue(aRecord, kABPersonOrganizationProperty, companyName, &error);
}
/*******************/
CFErrorRef error = NULL;
BOOL isSaved = ABAddressBookSave ( addressBook, &error);
CFRelease(addressBook);
}
Tuesday, December 29, 2009

Tuesday, December 15, 2009
Microsoft Dynamics CRM 4.0 on iPhone

ME for ms crm v4.3.4
iPhone Application for ms crm 4.0 released..
The mobile ms crm 4.0
The mobile ms crm 4.0
It supports
* Microsoft Dynamics CRM 4.0 - On-premise deployment
* Microsoft Dynamics CRM 4.0 – Internet-facing deployment (IFD)
* Microsoft Dynamics CRM Online
To register with ms crm 4.0 , you have to give the crm url, user name, password, organization name
ME for MSCRM v5.0.0 launched
Monday, December 14, 2009
iPhone Application for Lotus Notes CRM

iEnterprises, Inc. - Mobile Edge for Lotus Notes v4.3.4-
Mobile Edge for Lotus Notes allows you to replicate any Lotus Notes database to your iPhone and use it even when you are out of cellular network coverage. Mobile Edge for Lotus Notes is ideal for workflow approval, Lotus Notes CRM applications and other Lotus Notes applications that are beneficial to have on the iPhone.
Register or run 30 day trial..
support
Friday, December 11, 2009
Where to find Organization name in Mircosoft Dynamics CRM
Where to find my CRM Organization Name?
//updated +20110119
To find the right Organization Name, please follow the below steps:
MS CRM 2011 Online

When click on "Developer Resource" , we can see the organization name on next page
For MS CRM 4.0:
In IFD deployment, you may find the Unique CRM Organization Name as part of URL

Internally, the organization name can also be part of the URL:
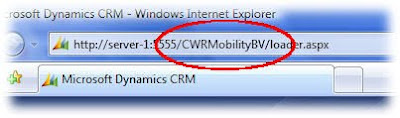
In MSCRM online deployment , we can find it in two places
1. Login to CRM, find the "Settings" link on left bottom, and click on "Customization" , and click on "Download wsdl" -- see the below image

2. In the Microsoft CRM Deployment Manager:
(start->programs->Microsoft Dynamics ->Deployment Manger, open the 'Organizations' folder)
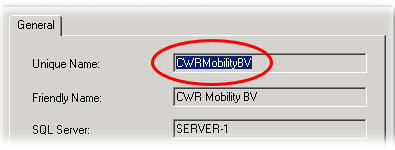
//updated +20110119
To find the right Organization Name, please follow the below steps:
MS CRM 2011 Online

When click on "Developer Resource" , we can see the organization name on next page
For MS CRM 4.0:
In IFD deployment, you may find the Unique CRM Organization Name as part of URL
Internally, the organization name can also be part of the URL:
In MSCRM online deployment , we can find it in two places
1. Login to CRM, find the "Settings" link on left bottom, and click on "Customization" , and click on "Download wsdl" -- see the below image

2. In the Microsoft CRM Deployment Manager:
(start->programs->Microsoft Dynamics ->Deployment Manger, open the 'Organizations' folder)

Wednesday, December 9, 2009
Learn To Use Blackberry

Move around the screen
• To move the cursor in any direction and highlight items, roll the trackball.
• To select an item or follow a link, click the trackball.
• To open a menu, press the key.
• To close a menu or move back a screen, press the key.
Open a menu
• To open a list of the applications on your BlackBerry® device, press the
key on the Home screen.
• To open a menu of all the available actions for a highlighted item in an
application, press the key.
• If you click an item with more than one common available action, a short menu
of these available actions appears. To view more available actions for the
highlighted item, press the key or click Full Menu.
Tuesday, December 8, 2009
Blackberry - Java Application Development - Get Started
1. Download Development Tools
We can use RIM(Risearch In Motion) Blackberry JDE, But for java developers it is easy to work with Eclipse environment
So we can download these java-eclipse development tool for blackberry JDE from HERE
Downloaded this plug-in from above link..
Eclipse
Ensure that your computer meets the following requirements before you install and run the BlackBerry® JDE Plug-
in for Eclipse™:
• Computer monitor with resolution 1024 x 768 or higher
• Intel® Pentium® 4 Processor (minimum 3 GHz)
• 1.5 GB Hard drive
• 1 GB RAM
• Microsoft® Windows Vista™, or Windows® XP
• Java® SE Development Kit (JDK) version 5 or version 6 (download from the Sun® Microsystems web site).
Version 6 is required if you are using BlackBerry MDS-CS for debugging.
• You can use the BlackBerry JDE Plug-in for Eclipse with an existing installation of Eclipse IDE for Java
Developers version 3.4.0.
Setting up the BlackBerry JDE Plug-in for Eclipse
To create a BlackBerry Application for a specific version of BlackBerry Device Software, you must use a version of
the BlackBerry® Java® Development Environment or component pack plug-in that matches the version of
BlackBerry Device Software that you want to run the application on.
1. In Eclipse™, on the Window menu, click Preferences.
2. Expand the BlackBerry JDE item.
3. Select Installed Components.
4. In the Components section, select an installed component from the drop-down list.
5. Click OK until the Preferences window disappears.
Change the heap memory for Eclipse
1. Create a shortcut to the Eclipse™ executable.
2. Right-click the executable and add the following parameters to the properties: -vmargs -Xmx256M
Enable application preprocessing
You can enable preprocessing for your applications by updating the Eclipse™ configuration file.
> In C:\Program Files\Eclipse\configuration\config.ini, add the following line:
osgi.framework.extensions=net.rim.eide.preprocessing.hook
If you enable preprocessing after you have had a build, you must clean the project from the Project menu before
you build the project again.
Create an application for a specific version of the BlackBerry Device Software
1. In Eclipse™, on the Window menu, click Preferences.
2. Expand the BlackBerry JDE item.
3. Select Installed Components.
4. In the Components field, select a BlackBerry JDE component package plug-in.
5. Click OK.
Enable functionality similar to the BlackBerry Java
Development Environment
1. Open the Eclipse™ workspace.
2. On the Window menu, select Preferences.
3. Expand the General item.
4. Select the Workspace item.
5. Clear the Build automatically option.
6. Clear the Refresh automatically option.
7. Select the Save automatically before build option.
Removing the BlackBerry JDE Plug-in for Eclipse
If you used the installer for the BlackBerry® JDE Plug-In for Eclipse™, perform the following steps to remove the
plug-in:
1. Close any instances of Eclipse.
2. In the file system, browse to the Eclipse installation directory.
3. Browse to the Eclipse\plugins folder.
4. Remove the following files and folders:
net.rim.eide.bootstrapper_ *.jar
net.rim.eide.componentpack_*
net.rim.eide.doc_ *.jar
net.rim.eide.preprocessing.hook_*.jar
net.rim.eide_ *.jar
5. Browse to the Eclipse\features folder.
6. Remove the following folders:
net.rim.EclipseJDE_*
net.rim.eide.feature.componentpack*
7. Browse to the configuration folder and remove the following line from the config.ini file:
osgi.framework.extensions=net.rim.eide.preprocessing.hook
/**
* The sentinal sample!
*
* Copyright ¨ 1998-2007 Research In Motion Ltd.
*/
/**
* The sentinal sample!
*
* Copyright ¨ 1998-2007 Research In Motion Ltd.
*/
package com.sample;
import com.resource.*;
import net.rim.device.api.ui.*;
import net.rim.device.api.ui.component.*;
import net.rim.device.api.ui.container.*;
import net.rim.device.api.i18n.*;
import net.rim.device.api.system.*;
import net.rim.device.api.collection.util.*;
public class HelloWorld extends UiApplication
{
//statics ------------------------------------------------------------------
public static void main(String[] args)
{
HelloWorld theApp = new HelloWorld();
//To make the application enter the event thread and start processing messages, we invoke the enterEventDispatcher method
theApp.enterEventDispatcher();
}
/**
* <p>the default constructor. Creates all the RIM UI components and pushes the application's root screen onto the UI stack
*/
public HelloWorld()
{
//Push the main screen instance onto the UI stack for rendering.
pushScreen(new HelloWorldScreen());
}
}
/*package*/ final class HelloWorldScreen extends MainScreen implements HelloWorldResResource
{
//members ------------------------------------------------------------------
/**
* <p>It is RIM recommended practice that you internationalize your code from the
* beginning. In order to do so, you'll need to create an RRH file, and various
* RRC files, one for each language or dialect you intend to support.
* Review the associated RRH and RRC files included with this project. Notice
* that the HelloWorld class implements a resouce interface. That interface
* is automatically generated from the RRH file.
*/
private static ResourceBundle _resources = ResourceBundle.getBundle(BUNDLE_ID, BUNDLE_NAME);
/**
* Add the title and a simple richtext field
*/
public HelloWorldScreen()
{
super(DEFAULT_MENU | DEFAULT_CLOSE);
//Add a field to the title region of the screen. We use a simple LabelField here. The ELLIPSIS option truncates
// the label text with "..." if the text was too long for the space available.
setTitle(new LabelField(_resources.getString(HELLOWORLD_TITLE), LabelField.ELLIPSIS | LabelField.USE_ALL_WIDTH));
//Add a read only text field (RichTextField) to the field portion of the screen. The RTF is focusable by default.
add(new RichTextField(_resources.getString(HELLOWORLD_CONTENTSTRING)));
}
public boolean onClose()
{
Dialog.alert(_resources.getString(HELLOWORLD_EXITSTRING));
System.exit(0);
return true;
}
public boolean keyChar(char key, int status, int time) {
//intercept the ESC key - exit the app on its receipt
boolean retval = false;
switch (key) {
case Characters.ESCAPE:
onClose();
retval = true;
break;
}
return retval;
}
}
//It will be good if anyone suggest me to format the source above, if any online resource?
In the above HelloWorld program we are using language Resource, To do this,
File->New->Project, and select "Blackberry Resource File"
give file name to HelloWorldRes.rrh and select the folder sample in our project src path
Finish.
open the file and add these key and values
HELLOWORLD_TITLE as key and value as "HelloWorld !!"
do similar for
HELLOWORLD_CONTENTSTRING
HELLOWORLD_EXITSTRING
Build and Run the Program..
Run As Blackberry Simulator
After Launching Simulator, click the menu key, it will list all Applications, Select our application and open it..
How to set icon for the Application:
will be back at evening :)
We can use RIM(Risearch In Motion) Blackberry JDE, But for java developers it is easy to work with Eclipse environment
So we can download these java-eclipse development tool for blackberry JDE from HERE
Downloaded this plug-in from above link..
Top Tools
Prerequisites: Installing the BlackBerry JDE Plug-in forEclipse
Ensure that your computer meets the following requirements before you install and run the BlackBerry® JDE Plug-
in for Eclipse™:
• Computer monitor with resolution 1024 x 768 or higher
• Intel® Pentium® 4 Processor (minimum 3 GHz)
• 1.5 GB Hard drive
• 1 GB RAM
• Microsoft® Windows Vista™, or Windows® XP
• Java® SE Development Kit (JDK) version 5 or version 6 (download from the Sun® Microsystems web site).
Version 6 is required if you are using BlackBerry MDS-CS for debugging.
• You can use the BlackBerry JDE Plug-in for Eclipse with an existing installation of Eclipse IDE for Java
Developers version 3.4.0.
Setting up the BlackBerry JDE Plug-in for Eclipse
To create a BlackBerry Application for a specific version of BlackBerry Device Software, you must use a version of
the BlackBerry® Java® Development Environment or component pack plug-in that matches the version of
BlackBerry Device Software that you want to run the application on.
1. In Eclipse™, on the Window menu, click Preferences.
2. Expand the BlackBerry JDE item.
3. Select Installed Components.
4. In the Components section, select an installed component from the drop-down list.
5. Click OK until the Preferences window disappears.
Change the heap memory for Eclipse
1. Create a shortcut to the Eclipse™ executable.
2. Right-click the executable and add the following parameters to the properties: -vmargs -Xmx256M
Enable application preprocessing
You can enable preprocessing for your applications by updating the Eclipse™ configuration file.
> In C:\Program Files\Eclipse\configuration\config.ini, add the following line:
osgi.framework.extensions=net.rim.eide.preprocessing.hook
If you enable preprocessing after you have had a build, you must clean the project from the Project menu before
you build the project again.
Create an application for a specific version of the BlackBerry Device Software
1. In Eclipse™, on the Window menu, click Preferences.
2. Expand the BlackBerry JDE item.
3. Select Installed Components.
4. In the Components field, select a BlackBerry JDE component package plug-in.
5. Click OK.
Enable functionality similar to the BlackBerry Java
Development Environment
1. Open the Eclipse™ workspace.
2. On the Window menu, select Preferences.
3. Expand the General item.
4. Select the Workspace item.
5. Clear the Build automatically option.
6. Clear the Refresh automatically option.
7. Select the Save automatically before build option.
Removing the BlackBerry JDE Plug-in for Eclipse
If you used the installer for the BlackBerry® JDE Plug-In for Eclipse™, perform the following steps to remove the
plug-in:
1. Close any instances of Eclipse.
2. In the file system, browse to the Eclipse installation directory.
3. Browse to the Eclipse\plugins folder.
4. Remove the following files and folders:
net.rim.eide.bootstrapper_ *.jar
net.rim.eide.componentpack_*
net.rim.eide.doc_ *.jar
net.rim.eide.preprocessing.hook_*.jar
net.rim.eide_ *.jar
5. Browse to the Eclipse\features folder.
6. Remove the following folders:
net.rim.EclipseJDE_*
net.rim.eide.feature.componentpack*
7. Browse to the configuration folder and remove the following line from the config.ini file:
osgi.framework.extensions=net.rim.eide.preprocessing.hook
Creating your own HelloWorld
Hope that you all are familiar with Eclipse
Click File -> New -> Project
In the window, drill down the blackberry and select blackberry project
give project name and click finish
In src folder, create a class HelloWorld under the package com.sample
orkspace… and then give your program a name like MyHelloWorld. In the second box add MyHelloWorld to the end of the creation path leaving off the last backslash. Click Ok and then Yes to the directory creation question. You now have a new workspace in which to put your project.
/**
* The sentinal sample!
*
* Copyright ¨ 1998-2007 Research In Motion Ltd.
*/
/**
* The sentinal sample!
*
* Copyright ¨ 1998-2007 Research In Motion Ltd.
*/
package com.sample;
import com.resource.*;
import net.rim.device.api.ui.*;
import net.rim.device.api.ui.component.*;
import net.rim.device.api.ui.container.*;
import net.rim.device.api.i18n.*;
import net.rim.device.api.system.*;
import net.rim.device.api.collection.util.*;
public class HelloWorld extends UiApplication
{
//statics ------------------------------------------------------------------
public static void main(String[] args)
{
HelloWorld theApp = new HelloWorld();
//To make the application enter the event thread and start processing messages, we invoke the enterEventDispatcher method
theApp.enterEventDispatcher();
}
/**
* <p>the default constructor. Creates all the RIM UI components and pushes the application's root screen onto the UI stack
*/
public HelloWorld()
{
//Push the main screen instance onto the UI stack for rendering.
pushScreen(new HelloWorldScreen());
}
}
/*package*/ final class HelloWorldScreen extends MainScreen implements HelloWorldResResource
{
//members ------------------------------------------------------------------
/**
* <p>It is RIM recommended practice that you internationalize your code from the
* beginning. In order to do so, you'll need to create an RRH file, and various
* RRC files, one for each language or dialect you intend to support.
* Review the associated RRH and RRC files included with this project. Notice
* that the HelloWorld class implements a resouce interface. That interface
* is automatically generated from the RRH file.
*/
private static ResourceBundle _resources = ResourceBundle.getBundle(BUNDLE_ID, BUNDLE_NAME);
/**
* Add the title and a simple richtext field
*/
public HelloWorldScreen()
{
super(DEFAULT_MENU | DEFAULT_CLOSE);
//Add a field to the title region of the screen. We use a simple LabelField here. The ELLIPSIS option truncates
// the label text with "..." if the text was too long for the space available.
setTitle(new LabelField(_resources.getString(HELLOWORLD_TITLE), LabelField.ELLIPSIS | LabelField.USE_ALL_WIDTH));
//Add a read only text field (RichTextField) to the field portion of the screen. The RTF is focusable by default.
add(new RichTextField(_resources.getString(HELLOWORLD_CONTENTSTRING)));
}
public boolean onClose()
{
Dialog.alert(_resources.getString(HELLOWORLD_EXITSTRING));
System.exit(0);
return true;
}
public boolean keyChar(char key, int status, int time) {
//intercept the ESC key - exit the app on its receipt
boolean retval = false;
switch (key) {
case Characters.ESCAPE:
onClose();
retval = true;
break;
}
return retval;
}
}
//It will be good if anyone suggest me to format the source above, if any online resource?
In the above HelloWorld program we are using language Resource, To do this,
File->New->Project, and select "Blackberry Resource File"
give file name to HelloWorldRes.rrh and select the folder sample in our project src path
Finish.
open the file and add these key and values
HELLOWORLD_TITLE as key and value as "HelloWorld !!"
do similar for
HELLOWORLD_CONTENTSTRING
HELLOWORLD_EXITSTRING
Build and Run the Program..
Run As Blackberry Simulator
After Launching Simulator, click the menu key, it will list all Applications, Select our application and open it..
How to set icon for the Application:
will be back at evening :)
Subscribe to:
Posts (Atom)