Tuesday, December 29, 2009
Tuesday, December 15, 2009
Microsoft Dynamics CRM 4.0 on iPhone
ME for ms crm v4.3.4
The mobile ms crm 4.0
Monday, December 14, 2009
iPhone Application for Lotus Notes CRM
iEnterprises, Inc. - Mobile Edge for Lotus Notes v4.3.4-
Mobile Edge for Lotus Notes allows you to replicate any Lotus Notes database to your iPhone and use it even when you are out of cellular network coverage. Mobile Edge for Lotus Notes is ideal for workflow approval, Lotus Notes CRM applications and other Lotus Notes applications that are beneficial to have on the iPhone.
Register or run 30 day trial..
support
Friday, December 11, 2009
Where to find Organization name in Mircosoft Dynamics CRM
//updated +20110119
To find the right Organization Name, please follow the below steps:
MS CRM 2011 Online

When click on "Developer Resource" , we can see the organization name on next page
For MS CRM 4.0:
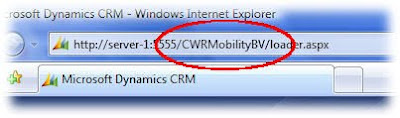
In IFD deployment, you may find the Unique CRM Organization Name as part of URL

Internally, the organization name can also be part of the URL:
In MSCRM online deployment , we can find it in two places
1. Login to CRM, find the "Settings" link on left bottom, and click on "Customization" , and click on "Download wsdl" -- see the below image

2. In the Microsoft CRM Deployment Manager:
(start->programs->Microsoft Dynamics ->Deployment Manger, open the 'Organizations' folder)

Wednesday, December 9, 2009
Learn To Use Blackberry

Move around the screen
• To move the cursor in any direction and highlight items, roll the trackball.
• To select an item or follow a link, click the trackball.
• To open a menu, press the key.
• To close a menu or move back a screen, press the key.
Open a menu
• To open a list of the applications on your BlackBerry® device, press the
key on the Home screen.
• To open a menu of all the available actions for a highlighted item in an
application, press the key.
• If you click an item with more than one common available action, a short menu
of these available actions appears. To view more available actions for the
highlighted item, press the key or click Full Menu.
Tuesday, December 8, 2009
Blackberry - Java Application Development - Get Started
We can use RIM(Risearch In Motion) Blackberry JDE, But for java developers it is easy to work with Eclipse environment
So we can download these java-eclipse development tool for blackberry JDE from HERE
Downloaded this plug-in from above link..
Top Tools
Prerequisites: Installing the BlackBerry JDE Plug-in forEclipse
Ensure that your computer meets the following requirements before you install and run the BlackBerry® JDE Plug-
in for Eclipse™:
• Computer monitor with resolution 1024 x 768 or higher
• Intel® Pentium® 4 Processor (minimum 3 GHz)
• 1.5 GB Hard drive
• 1 GB RAM
• Microsoft® Windows Vista™, or Windows® XP
• Java® SE Development Kit (JDK) version 5 or version 6 (download from the Sun® Microsystems web site).
Version 6 is required if you are using BlackBerry MDS-CS for debugging.
• You can use the BlackBerry JDE Plug-in for Eclipse with an existing installation of Eclipse IDE for Java
Developers version 3.4.0.
Setting up the BlackBerry JDE Plug-in for Eclipse
To create a BlackBerry Application for a specific version of BlackBerry Device Software, you must use a version of
the BlackBerry® Java® Development Environment or component pack plug-in that matches the version of
BlackBerry Device Software that you want to run the application on.
1. In Eclipse™, on the Window menu, click Preferences.
2. Expand the BlackBerry JDE item.
3. Select Installed Components.
4. In the Components section, select an installed component from the drop-down list.
5. Click OK until the Preferences window disappears.
Change the heap memory for Eclipse
1. Create a shortcut to the Eclipse™ executable.
2. Right-click the executable and add the following parameters to the properties: -vmargs -Xmx256M
Enable application preprocessing
You can enable preprocessing for your applications by updating the Eclipse™ configuration file.
> In C:\Program Files\Eclipse\configuration\config.ini, add the following line:
osgi.framework.extensions=net.rim.eide.preprocessing.hook
If you enable preprocessing after you have had a build, you must clean the project from the Project menu before
you build the project again.
Create an application for a specific version of the BlackBerry Device Software
1. In Eclipse™, on the Window menu, click Preferences.
2. Expand the BlackBerry JDE item.
3. Select Installed Components.
4. In the Components field, select a BlackBerry JDE component package plug-in.
5. Click OK.
Enable functionality similar to the BlackBerry Java
Development Environment
1. Open the Eclipse™ workspace.
2. On the Window menu, select Preferences.
3. Expand the General item.
4. Select the Workspace item.
5. Clear the Build automatically option.
6. Clear the Refresh automatically option.
7. Select the Save automatically before build option.
Removing the BlackBerry JDE Plug-in for Eclipse
If you used the installer for the BlackBerry® JDE Plug-In for Eclipse™, perform the following steps to remove the
plug-in:
1. Close any instances of Eclipse.
2. In the file system, browse to the Eclipse installation directory.
3. Browse to the Eclipse\plugins folder.
4. Remove the following files and folders:
net.rim.eide.bootstrapper_ *.jar
net.rim.eide.componentpack_*
net.rim.eide.doc_ *.jar
net.rim.eide.preprocessing.hook_*.jar
net.rim.eide_ *.jar
5. Browse to the Eclipse\features folder.
6. Remove the following folders:
net.rim.EclipseJDE_*
net.rim.eide.feature.componentpack*
7. Browse to the configuration folder and remove the following line from the config.ini file:
osgi.framework.extensions=net.rim.eide.preprocessing.hook
Creating your own HelloWorld
Hope that you all are familiar with Eclipse
Click File -> New -> Project
In the window, drill down the blackberry and select blackberry project
give project name and click finish
In src folder, create a class HelloWorld under the package com.sample
orkspace… and then give your program a name like MyHelloWorld. In the second box add MyHelloWorld to the end of the creation path leaving off the last backslash. Click Ok and then Yes to the directory creation question. You now have a new workspace in which to put your project.
/**
* The sentinal sample!
*
* Copyright ¨ 1998-2007 Research In Motion Ltd.
*/
/**
* The sentinal sample!
*
* Copyright ¨ 1998-2007 Research In Motion Ltd.
*/
package com.sample;
import com.resource.*;
import net.rim.device.api.ui.*;
import net.rim.device.api.ui.component.*;
import net.rim.device.api.ui.container.*;
import net.rim.device.api.i18n.*;
import net.rim.device.api.system.*;
import net.rim.device.api.collection.util.*;
public class HelloWorld extends UiApplication
{
//statics ------------------------------------------------------------------
public static void main(String[] args)
{
HelloWorld theApp = new HelloWorld();
//To make the application enter the event thread and start processing messages, we invoke the enterEventDispatcher method
theApp.enterEventDispatcher();
}
/**
* <p>the default constructor. Creates all the RIM UI components and pushes the application's root screen onto the UI stack
*/
public HelloWorld()
{
//Push the main screen instance onto the UI stack for rendering.
pushScreen(new HelloWorldScreen());
}
}
/*package*/ final class HelloWorldScreen extends MainScreen implements HelloWorldResResource
{
//members ------------------------------------------------------------------
/**
* <p>It is RIM recommended practice that you internationalize your code from the
* beginning. In order to do so, you'll need to create an RRH file, and various
* RRC files, one for each language or dialect you intend to support.
* Review the associated RRH and RRC files included with this project. Notice
* that the HelloWorld class implements a resouce interface. That interface
* is automatically generated from the RRH file.
*/
private static ResourceBundle _resources = ResourceBundle.getBundle(BUNDLE_ID, BUNDLE_NAME);
/**
* Add the title and a simple richtext field
*/
public HelloWorldScreen()
{
super(DEFAULT_MENU | DEFAULT_CLOSE);
//Add a field to the title region of the screen. We use a simple LabelField here. The ELLIPSIS option truncates
// the label text with "..." if the text was too long for the space available.
setTitle(new LabelField(_resources.getString(HELLOWORLD_TITLE), LabelField.ELLIPSIS | LabelField.USE_ALL_WIDTH));
//Add a read only text field (RichTextField) to the field portion of the screen. The RTF is focusable by default.
add(new RichTextField(_resources.getString(HELLOWORLD_CONTENTSTRING)));
}
public boolean onClose()
{
Dialog.alert(_resources.getString(HELLOWORLD_EXITSTRING));
System.exit(0);
return true;
}
public boolean keyChar(char key, int status, int time) {
//intercept the ESC key - exit the app on its receipt
boolean retval = false;
switch (key) {
case Characters.ESCAPE:
onClose();
retval = true;
break;
}
return retval;
}
}
//It will be good if anyone suggest me to format the source above, if any online resource?
In the above HelloWorld program we are using language Resource, To do this,
File->New->Project, and select "Blackberry Resource File"
give file name to HelloWorldRes.rrh and select the folder sample in our project src path
Finish.
open the file and add these key and values
HELLOWORLD_TITLE as key and value as "HelloWorld !!"
do similar for
HELLOWORLD_CONTENTSTRING
HELLOWORLD_EXITSTRING
Build and Run the Program..
Run As Blackberry Simulator
After Launching Simulator, click the menu key, it will list all Applications, Select our application and open it..
How to set icon for the Application:
will be back at evening :)
Monday, November 30, 2009
java.lang.OutOfMemoryError: PermGen space on java Tomcat server, linux
# <%@ page import="java.lang.management.*, java.util.*" %><%
# response.setContentType("text/html");
# Iterator iter = ManagementFactory.getMemoryPoolMXBeans().iterator();
# while(iter.hasNext()){
# MemoryPoolMXBean item = (MemoryPoolMXBean) iter.next();
# MemoryUsage mu = item.getUsage();
# long used = mu.getUsed();
# long committed = mu.getCommitted();
# long max = mu.getMax();
# %>
# MEMORY TYPE: <%=item.getName()%>
# Used: <%=used%>
# Committed: <%= committed%>
# Max: <%=max%>
# <%}%>
Sunday, November 29, 2009
Code Sign Error: a valid provisioning profile could not be found
http://developer.apple.com/iphone/program/
The minimum amount is $99
This is a very helpful link to do the process after create an account
http://www.24100.net/2009/02/iphone-sdk-mobile-provisioning-0xe800003a-0xe8000001/
Also the apple documentation is available at iPhone Developer Program Portal
Monday, November 16, 2009
substring in objective c
//log the firstRange.location and firstRange.length and see whats that..
NSString *newStr = [[fullString substringFromIndex:startposition] substringToIndex:endposition];
want to see more.. click here
'NSInternalInconsistencyException', reason: 'Invalid update: invalid number of rows in section
When we remove data from sections, and if the section is empty , we have to remove the section also
following is the sample code:
This error throws when commitEditingStyle , Usually this exception is appearing when build with >= 3.0 level
When we remove data from sections, and if the section is empty , we have to remove the section also
following is the sample code:
- (void)tableView:(UITableView *)tableView commitEditingStyle:(UITableViewCellEditingStyle)editingStyle forRowAtIndexPath:(NSIndexPath *)indexPath
{
if (editingStyle == UITableViewCellEditingStyleDelete)
{
// modelForSection is a custom model object that holds items for this section.
[modelForSection removeItem:[self itemForRowAtIndexPath:indexPath]];
[tableView beginUpdates];
// Either delete some rows within a section (leaving at least one) or the entire section.
if ([modelForSection.items count] > 0)
{
// Section is not yet empty, so delete only the current row.
[tableView deleteRowsAtIndexPaths:[NSArray arrayWithObject:indexPath]
withRowAnimation:UITableViewRowAnimationFade];
}
else
{
// Section is now completely empty, so delete the entire section.
[tableView deleteSections:[NSIndexSet indexSetWithIndex:indexPath.section]
withRowAnimation:UITableViewRowAnimationFade];
}
[tableView endUpdates];
}
}
courtesy://http://stackoverflow.com/questions/1061071/uitableview-deleting-sections-with-animation
this is the error message I got
'Invalid update: invalid number of rows in section 0. The number of rows contained in an existing section after the update (3) must be equal to the number of rows contained in that section before the update (1), plus or minus the number of rows inserted or deleted from that section (0 inserted, 1 deleted).'
In my case the above solutions didn't work.. :(
I got this error when build the existing source with sdk 3.0 and above..My previous build level was 2.0. Now I want to shift to 3.0 ..
Solved by the following way
The error message describes that, the no.of rows should be same, after delete one row..
It means if you have only one row, and you delete that row, then the remaining row count should be zero
I have used a display like "No Contacts" when my list is empty, to implement this I added an array with size 3 and show that (No Contacts) when ever list is empty
so this is the corrected code in commitEditing style implementation
[arrayData removeObjectAtIndex:indexPath.row];
[tableView beginUpdates];
//this flag is used to check in numberOfRowsinSection(),
//the code would be
// if [arrayData count] == 0 && this flag is true, reset flag and return 0;
// if [arrayData count] == 0 && this flag is false return the array with size 3 to display "No //Contacts"
self.isRowDeleted = YES;
[tableView deleteRowsAtIndexPaths:[NSArray arrayWithObject:indexPath] withRowAnimation:UITableViewRowAnimationFade];
[tableView endUpdates];
//this is used to display "No Contacts"
if ([arrayData count] == 0 ){
[tableView reloadData];
}
compare iphone 3g and iphone 3gs
see the differences in http://www.apple.com/iphone/compare-iphones/
setHidesAccessoryWhenEditing is deprecated
cell.editingAccessoryType
or
cell.editingAccessoryView
the documentation describes all... :)
Sunday, November 15, 2009
setTextColor is deprecated
old code for version :
cell.textColor = [UIColor redColor];
the new code will be
[cell.textLabel setTextColor:[UIColor redColor]];
setFont is deprecated
1.UITableviewCell
old code for version :
cell.font = [UIFont boldSystemFontOfSize: 16];
the new code will be
[cell.textLabel setFont:[UIFont boldSystemFontOfSize: 16]];
2.UIButton
[cell.aButton.titleLabel setFont:[UIFont boldSystemFontOfSize:16]];
setImage is deprecated
old code for version :
cell.image = [UIImage imageNamed:@"image1.png"];
the new code will be
[cell.imageView setImage:[UIImage imageNamed:@"image1.png"]];
setText is deprecated
old code for version <3 cell.text = @"cell text";
the new code will be
[cell.textLabel setText:@"cell text"];
Thursday, November 12, 2009
Convert wmv(or any) video to m4v format on MAC OS to load in iPhone or iPod
free screen capture(image or video) software for Mac OS
just search "Jing for Mac" in google and download ...enjoy :)
How to take screen shot in Mac OS
But in Mac, this is very simple
use "command"+"shift"+"4" buttons, and drag a rectangle using mouse , the selected area would be saved into desktop as a picture#.png file
Monday, November 9, 2009
Thursday, November 5, 2009
APNS with java
To send notification from java, I found this
1. download apns.jar from the above link
2.
add apns.jar, commons-lang-2.0.jar files into your build path
the following is the sample program
try{
PayLoad simplePayLoad = new PayLoad();
simplePayLoad.addAlert("My alert message");
simplePayLoad.addBadge(1);
simplePayLoad.addSound("default");
PushNotificationManager.getInstance().addDevice("jijo's iPhone","give device token get from didRegisterForRemoteNotificationsWithDeviceToken delegate");
Device client = PushNotificationManager.getInstance().getDevice("jijo's iPhone");
PushNotificationManager.getInstance().initializeConnection("gateway.sandbox.push.apple.com", 2195, "C:/temp/APNSCertificates.p12", "paawordgivenwhenexport from keychain by click 'export 2 item' menu item", SSLConnectionHelper.KEYSTORE_TYPE_PKCS12);
PushNotificationManager.getInstance().sendNotification(client, simplePayLoad);
}catch(Exception e){
e.printStackTrace();
}
I have also posted the same code as comments on that site
How to create APNSCertificates.p12 file from login keychain
After enable the push on your application from apple site, and install on your machine, you can see the same in keychain.

select the installed push ceritificate and key, right click and select the menu item "Export 2 items"

and give a name ( say: APNSCertificates.p12) .
APNS : no valid 'aps-environment' entitlement string found for application
My application runs fine on device, To implement APNS I configure the App Id on iPhone Developer Program also look at how to tab, and also go through this guide
implement APNS on client source
to implement this , there are lot of good tutorial on internet
http://www.z2live.com/push_notifications
http://www.macoscoders.com/2009/05/17/iphone-apple-push-notification-service-apns/
http://ameyashetti.wordpress.com/2009/07/31/apple-push-notification-service-tutorial/
after do all these We have to create a new provisioning profile(or remove the old one and create with same name) and download it and install both xcode and iphone
remove old profile from xcode and iphone and install new profiles
Dont forget to change the "code signing identity" in settings and "Bundle Identifier" in .plist file if you are create new profile
this will solved the above mentioned error
Friday, September 25, 2009
iPhone: Display "No Contacts" like in the iPhone contacts
create an array with size of no.of cells displayed and populate the center cell.
cell.textLabel.text= @"No Contacts";
cell.textLabel.textAlignment= UITextAlignmentCenter;
cell.textLabel.textColor= [UIColor lightGrayColor];
or
this post fulfill the same
iPhone: create UITabBarController + UINavigationController + UITableViewController
We can create application by choose File->New Project ,and select 'window-based application'
Give a name (say tabbarsample) and save the project
create tableviewcontroller file to display when click on tab
File->New File, select UIViewController subclass, and check the UITableViewController subclass
give a name (example MyTableViewController)
create an instance of NSObject file to retrieve data from that class
File->New File, select Objective-C class, and select subclass of NSObject
give file name example DataAccess
After doing these steps, we can see six files in our classes folder
This is the final product :


Its better to show the code in all six files, it will tell the remaining part..
//
// tabbarsampleAppDelegate.h
// tabbarsample
#import &lt;UIKit/UIKit.h&gt;
@interface tabbarsampleAppDelegate : NSObject &lt;UIApplicationDelegate, UITabBarControllerDelegate&gt; {
UIWindow *window;
UITabBarController *mytabBarController;
}
@property (nonatomic, retain) IBOutlet UIWindow *window;
@property (nonatomic, retain) UITabBarController *mytabBarController;
@end
//
// tabbarsampleAppDelegate.m
// tabbarsample
//
#import "tabbarsampleAppDelegate.h"
#import "MyTableViewController.h"
@implementation tabbarsampleAppDelegate
@synthesize window;
@synthesize mytabBarController;
- (void)applicationDidFinishLaunching:(UIApplication *)application {
mytabBarController = [[UITabBarController alloc] init];
NSMutableArray *array = [[NSMutableArray alloc] init];
MyTableViewController *myTableViewController1 = [[MyTableViewController alloc] initWithParam:1];
UINavigationController *myTableNavController1 = [[UINavigationController alloc] initWithRootViewController:myTableViewController1] ;
[array addObject:myTableNavController1];
[myTableViewController1 release];
[myTableNavController1 release];
myTableViewController1 = nil;
myTableNavController1 = nil;
MyTableViewController *myTableViewController2 = [[MyTableViewController alloc] initWithParam:3];
UINavigationController *myTableNavController2 = [[UINavigationController alloc] initWithRootViewController:myTableViewController2] ;
[array addObject:myTableNavController2];
[myTableViewController2 release];
[myTableNavController2 release];
myTableViewController2 = nil;
myTableNavController2 = nil;
MyTableViewController *myTableViewController = [[MyTableViewController alloc] initWithParam:6];
UINavigationController *myTableNavController = [[UINavigationController alloc] initWithRootViewController:myTableViewController] ;
[array addObject:myTableNavController];
[myTableViewController release];
[myTableNavController release];
myTableViewController = nil;
myTableNavController = nil;
window.autoresizingMask = UIViewAutoresizingFlexibleWidth | UIViewAutoresizingFlexibleHeight;
mytabBarController.view.autoresizingMask = UIViewAutoresizingFlexibleWidth | UIViewAutoresizingFlexibleHeight;
mytabBarController.viewControllers = array;
[window setBackgroundColor:[UIColor whiteColor]];
[window addSubview:mytabBarController.view];
mytabBarController.delegate = self;
[array release];
// Override point for customization after application launch
[window makeKeyAndVisible];
}
- (void)dealloc {
[mytabBarController release];
[window release];
[super dealloc];
}
#pragma mark UITabBarControllerDelegate
- (void)tabBarController:(UITabBarController *)tabBarController didEndCustomizingViewControllers:(NSArray *)viewControllers changed:(BOOL)changed{
if(changed){
//write the object to persistent stroe to retrive on next launch
}
}
- (void)tabBarController:(UITabBarController *)tabBarController didSelectViewController:(UIViewController *)viewController{
NSLog(@"clicked index at %i",tabBarController.selectedIndex);
}
@end
//
// MyTableViewController.h
// tabbarsample
//
#import
@interface MyTableViewController : UITableViewController {
NSArray *arrayData;
}
@property(nonatomic, retain) NSArray *arrayData;
- (id)initWithParam:(NSUInteger)param;
@end
//
// MyTableViewController.m
// tabbarsample
//
#import "MyTableViewController.h"
#import "DataAccess.h"
@implementation MyTableViewController
@synthesize arrayData;
- (id)initWithParam:(NSUInteger)param {
// Override initWithStyle: if you create the controller programmatically and want to perform customization that is not appropriate for viewDidLoad.
if (self = [super init]) {
DataAccess *dataAccess = [[DataAccess alloc]init];
self.arrayData = [dataAccess getDataForType:param];
[dataAccess release];
self.title = [NSString stringWithFormat:@"type_%i", param];
self.tabBarItem.image = [UIImage imageNamed:@"images.png"];
//self.tabBarItem.tag = param;//can use for CustomizingViewControllers
}
return self;
}
- (void)didReceiveMemoryWarning {
// Releases the view if it doesn't have a superview.
[super didReceiveMemoryWarning];
// Release any cached data, images, etc that aren't in use.
}
- (void)viewDidUnload {
// Release any retained subviews of the main view.
// e.g. self.myOutlet = nil;
}
#pragma mark Table view methods
- (NSInteger)numberOfSectionsInTableView:(UITableView *)tableView {
return 1;
}
// Customize the number of rows in the table view.
- (NSInteger)tableView:(UITableView *)tableView numberOfRowsInSection:(NSInteger)section {
NSUInteger countt = [arrayData count];
if(countt>0){
return [arrayData count];
}
else{
return 4;//to show "No Items" on 4rd cell
}
}
// Customize the appearance of table view cells.
- (UITableViewCell *)tableView:(UITableView *)tableView cellForRowAtIndexPath:(NSIndexPath *)indexPath {
UITableViewCell *cell = nil;
if([arrayData count] > 0){
static NSString *CellIdentifier = @"Cell";
cell = [tableView dequeueReusableCellWithIdentifier:CellIdentifier];
if (cell == nil) {
cell = [[[UITableViewCell alloc] initWithStyle:UITableViewCellStyleDefault reuseIdentifier:CellIdentifier] autorelease];
}
// Set up the cell...
cell.textLabel.text = [arrayData objectAtIndex:indexPath.row];
}else{
static NSString *CellIdentifier = @"NoData";
cell = [tableView dequeueReusableCellWithIdentifier:CellIdentifier];
if (cell == nil) {
cell = [[[UITableViewCell alloc] initWithStyle:UITableViewCellStyleDefault reuseIdentifier:CellIdentifier] autorelease];
}
cell.selectionStyle = UITableViewCellSelectionStyleNone;
// Set up the cell...
if(indexPath.row == 3){
cell.textLabel.text= @"No Items";
cell.textLabel.textAlignment= UITextAlignmentCenter;
cell.textLabel.textColor= [UIColor lightGrayColor];
}else{
cell.textLabel.text = @"";
}
}
return cell;
}
- (void)tableView:(UITableView *)tableView didSelectRowAtIndexPath:(NSIndexPath *)indexPath {
}
- (void)dealloc {
[arrayData release];
[super dealloc];
}
@end
//
// DataAccess.h
// tabbarsample
//
#import
@interface DataAccess : NSObject {
}
-(NSArray *)getDataForType:(NSUInteger)typeOfData;
@end
//
// DataAccess.m
// tabbarsample
//
#import "DataAccess.h"
@implementation DataAccess
-(NSArray *)getDataForType:(NSUInteger)typeOfData{
//to test "No Items"
if(typeOfData == 6){
NSMutableArray *array = [[NSMutableArray alloc] init];
return [array autorelease];
}else
if(typeOfData == 1){
NSArray *array = [NSArray arrayWithObjects:@"type1 cell0",@"type1 cell1",@"type1 cell2",@"type1 cell3",nil];
return array;
}else{
NSMutableArray *array = [[NSMutableArray alloc] init];
for(int i=0 ; i<3*typeofdata>
[array addObject:[NSString stringWithFormat:@"type%i cell_%i",typeOfData,i]];
}
return [array autorelease];
}
}
@end
used iPhone sdk 3.1
tested with Simulator 3.1/Debug
thanks to reading..:)
Thursday, September 24, 2009
connecting Microsoft Dynamic CRM 3.0 with java code
Its not difficult to connect ms crm 3.0 with java code using both ntlm and basic authentication..
First Step: download web service description files(CrmService.asmx, MetadataService.asmx) from Mircosoft Dynamics CRM
And convert to equivalent java classes
create a folder CrmService and execute this command
do the same for metadataservice to convert to java code.
combine both sources..
Create new project in your eclipse, and test login..
For basic authentication , we can use axis1.4 file
To connect with ntlm authentication, we have to edit the client-config.wsdd file in axis1.4 jar, Hope that you all know about this.. please comment if you need further help with this..
/*added on +20101220 */
easy way to edit is: open the axis.jar file with winrar application
go to the folder org->apache->axis->client and open the file client-config.wsdd and edit the following changes and save. check once again the changes are there.
/*********/
The following is the sample client-config.wsdd
Along with axis jar, we need these two(commons-httpclient-3.1.jar, commons-codec-1.3.jar) jar files in our class-path to get ntlm authentication
sample code to login
CrmServiceSoapStub stub =  (CrmServiceSoapStub)
new CrmServiceLocator().getCrmServiceSoap(
new URL("http://###.###.#.###/MSCRMServices/2006/CrmService.asmx"));

stub.setUsername("crm\\user");
stub.setPassword("#######");
WhoAmIRequest request=new WhoAmIRequest();
WhoAmIResponse response=(WhoAmIResponse)stub.execute(Request);
System.out.println("----------getBusinessUnitId()--------->"+response.getBusinessUnitId());
System.out.println("----------getUserId()----------------->"+response.getUserId());
//can write on next post about connecting mscrm 4.0 with java code